자바스크립트의 사용의 궁극적인 목적은 동적 웹페이지의 작성이다. 따라서 사용자가 웹페이지의 HTML 요소를 클릭하거나 마우스를 이동하는 등의 경우 이벤트가 발생하며, 이벤트가 발생하면 그에 반응하는 과정을 자바스크립트에 의해 처리할 수 있다. 사용자가 HTML 요소를 클릭할 때 코드를 실행하려면 자바스크립트 코드를 HTML 이벤트 속성에 추가한다. 이벤트는 주로 다음의 경우에 발생한다.
1. 웹페이지가 로드 되었을 때
2. 사용자가 마우스를 클릭하거나 요소 위로 또는 위에서 움직일 때
3. 이미지가 로드 되었을 때
4. 입력 필드가 변경되었을 때
5. HTML 양식이 제출되었을 때
6. 키보드를 사용할 때
이벤트 : 웹 브라우저가 처리해야 할 특정 사건
이벤트 타겟 : 이벤트를 발생시킬 객체
이벤트 타입 : 이벤트의 종류를 나타내는 문자열 (약 200여가지)
이벤트 핸들러 : 이벤트가 발생했을 때 호출될 함수
이벤트 핸들러 등록 방법(3가지)
| HTML에서 | <element onclick = "myScript"> |
| JavaScript에서 | eventTarget.onclick = function(){myScript}; |
| EventListener에서 | eventTarget.addEventListener("click",myScript) |
1번 방식 : html과 js가 혼재되므로 비추천
2번 방식 : html과 js가 분리되어 있지만, 하나의 이벤트에 하나의 이벤트 핸들러만 등록 가능
3번 방식 : html과 js가 분리되어 있고, 하나의 이벤트에 여러 이벤트 핸들러 등록 가능
** addEventListener()메서드는 같은 이벤트에 다른 함수를 등록해도 덮어씌워지지 않고 추가로 등록된다. 같은 이벤트에 같은 함수를 여러개 등록하면 1개만 실행되며, removeEventListener()로 이벤트 핸들러를 지울 수 있다.
이벤트 핸들러 등록하기
HTML 요소에 이벤트를 지정하기 위해 이벤트를 속성으로 사용한다. 예를 들어, onclick속성
<!DOCTYPE html>
<html lang="en">
<head>
  <meta charset="UTF-8">
  <meta name="viewport" content="width=device-width, initial-scale=1.0">
  <title>event</title>
</head>
<body>
  <h1 onclick="changeText(this)">Click on this text!</h1>
  <!-- 클릭한 요소의 DOM 객체 -->
  <!-- h1 태그에 이벤트 핸들러(onclick)을 두었다. -->

  <script>
    function changeText(id) {
      id.innerHTML = "Ooops!"
    }
  </script>
</body>
</html>

click on this text! 클릭했을때 Ooops!로 text변경
<!DOCTYPE html>
<html lang="en">
<head>
  <meta charset="UTF-8">
  <meta name="viewport" content="width=device-width, initial-scale=1.0">
  <title>event</title>
</head>
<body>
  <button id="myBtn">Try it</button>
  <p id="demo"></p>

  <script>
    document.querySelector("#myBtn").onclick = displayDate;
    function displayDate() {
      document.querySelector("#demo").innerHTML = Date();
    }
  </script>
</body>
</html>
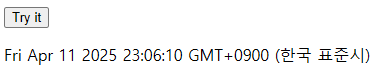
Try it button 클릭시 현재 시각 보여줌
<!DOCTYPE html>
<html lang="en">
<head>
  <meta charset="UTF-8">
  <meta name="viewport" content="width=device-width, initial-scale=1.0">
  <title>Document</title>
</head>
<body>
  Enter your name : <input type="text" id="fname">

  <script>
    document.querySelector("#fname").addEventListener("click",myFunction);
    function myFunction() {
      document.querySelector("#fname").style.backgroundColor = "pink";
      // this : 이벤트가 등록된 요소 (이벤트가 발생한 요소)
    }
  </script>
</body>
</html>

<!DOCTYPE html>
<html lang="en">
<head>
<meta charset="UTF-8">
<meta name="viewport" content="width=device-width, initial-scale=1.0">
<title>addeventlistener</title>
</head>
<body>
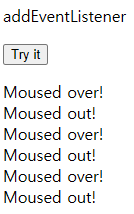
<p>addEventListener</p>
<button id="myBtn">Try it</button>
<p id="demo"></p>
<script>
let x = document.querySelector("#myBtn");
x.addEventListener("mouseover",firstFunction);
x.addEventListener("click",secondFunction);
x.addEventListener("click",thirdFunction);
x.addEventListener("mouseout",forthFunction);
function firstFunction() {
document.querySelector("#demo").innerHTML += "Moused over! <br>";
}
function secondFunction() {
alert("This function was also executed!");
}
function thirdFunction() {
alert("Hello World");
}
function forthFunction() {
document.querySelector("#demo").innerHTML += "Moused out! <br>";
}
</script>
</body>
</html>
step1. 이벤트를 줄 요소 선택하기
step2. 이벤트 핸들러 등록하기
step3. 함수 선언하기
step4. 함수 기능 구현하기
'웹 프로그래밍 기초 > DOM 문서객체' 카테고리의 다른 글
| addEventListener 실습예제 (2) | 2025.04.11 |
|---|---|
| addEventListener (0) | 2025.04.11 |
| document 컬렉션 (0) | 2025.04.11 |
| HTML 요소 검색하기 (0) | 2025.04.11 |
| HTML 요소 추가/삭제하기 (0) | 2025.04.11 |