▣ 가상 선택자
· 웹 문서에는 보이지 않지만 동작에 영향을 주는 속성을 가상 선택자로 이용
▣ 이벤트 가상 클래스 선택자
· 사용자가 마우스 이벤트 행위를 어떻게 하는지에 따라서 스타일 시트 다르게 적용
a:link { color: blue; }
| 사용 방법 | 설명 | 사용 예 |
| :link 선택자 | 웹 문서에서 사용자가 방문하지 않았던 곳을 표시한다. | a:link { color: red; text-decoration:none } |
| :visited 선택자 | 웹 문서에서 사용자가 방문한 곳을 표시한다 | a:visited { color: blue; } |
| :active 선택자 | 웹 문서에서 사용자가 링크를 클릭하는 순간을 나타낸다. | a:active { color: black; } |
| :hover 선택자 | 웹 문서에서 사용자가 링크에 마우스 포인터를 올리는 순간을 나타낸다. | a:hover { color: green; } |
| :focus 선택자 | 해당 요소에 초점이 맞춰졌을 때 적용된다. | a:focus { color: yellow; } |
<!DOCTYPE html>
<html lang="en">
<head>
  <meta charset="UTF-8">
  <meta name="viewport" content="width=device-width, initial-scale=1.0">
  <title>이벤트 가상 클래스 선택자 사용하기</title>

  <style>
    /* 가상 클래스 */
    a:link {
      color: blue;
      text-decoration: underline;
    }
    a:visited { color: red; }
    a:hover { text-decoration: overline; }
    a:active { background-color: yellow; }

    div.d1 {
      border: 1px dashed red;
      width: 400px;
      padding: 5px;
    }
    /* 가상 클래스 */
    div.d1:hover {background-color: pink;}

    div.d2 {
      border: 1px dashed green;
      width: 400px;
      padding: 5px;
    }
    /* 가상 클래스 */
    div.d2:hover {background-color: yellow;}
  </style>

</head>

<body>
  <h2>Pseudo Class</h2>
  <p><a href="http://www.w3.org" target="_blank">W3C 방문</a> : 마우스 이벤트에 따른 링크의 변화를 잘 보세요.</p>
  <div class="d1">
    <h3>가상 클래스 1 영역</h3>
    마우스 위치에 따른 박스의 스타일 변화를 보세요.
  </div>
  <div class="d2">
    <h3>가상 클래스 2 영역</h3>
    마우스 위치에 따른 박스의 스타일 변화를 보세요.
  </div>
</body>
</html>

<!DOCTYPE html>
<html lang="en">
<head>
  <meta charset="UTF-8">
  <meta name="viewport" content="width=device-width, initial-scale=1.0">
  <title>이벤트 가상 클래스 선택자 사용하기</title>

  <style>
    div {
      width: 200px;
      height: 100px;
      color: blue;
      background-color: green;
      opacity: 0.8;
    }
    /* 가상 클래스 */
    div:hover {
      width: 400px;
      height: 50px;
      color: red;
      background: yellow;
      opacity: 0.5;
      transition: all 1.5s linear 0.5s;
    }

  </style>

</head>

<body>

  <h2>가상 선택자</h2>
  <div>
    가상 클래스를 이용한 애니메이션 효과<br>
    마우스가 위에 있으면 박스가 늘어나용~
  </div>

</body>
</html>
▣ 구조적 가상 클래스 선택자의 종류
| 사용 방법 | 설명 |
| E:root | 문서의 최상위 태그(html)를 선택한다. |
| E:nth-child(n) | 앞에서부터 지정된 순서와 일치하는 태그가 E라면 선택한다 (E가 아닌 태그의 순서가 계산에 포함된다). n은 수열이다 |
| E:nth-last-child(n) | 뒤에서부터 지정된 순서와 일치하는 태그가 E라면 선택한다 (E가 아닌 태그의 순서가 계산에 포함된다). |
| E:nth-of-type(n) | E 태그 중 앞에서부터 순서가 일치하는 E 태그를 선택한다 (E태그의 순서만 계산에 포함된다). |
| E:nth-last-of-type(n) | E 태그 중 끝에서부터 순서가 일치하는 E 태그를 선택한다 (E태그의 순서만 계산에 포함된다). |
| E:first-child | 첫 번째 등장하는 태그가 E라면 선택한다(E가 아닌 태그의 순서가 계산에 포함된다). |
| E:last-child | 마지막에 등장하는 태그가 E라면 선택한다(E가 아닌 태그의 순서가 계산에 포함된다). |
| E:first-of-type | E 태그 중 첫번째 E를 선택한다(E 태그의 순서만 계산에 포함된다). |
| E:last-of-type | E 태그 중 마지막 E를 선택한다(E 태그의 순서만 계산에 포함된다). |
| E:only-child | E 태그가 유일한 자식이면 선택한다(E가 아닌 태그가 하나라도 포함되면 선택하지 않는다). |
| E:only-of-type | E 태그가 유일한 타입이면 선택한다(E가 아닌 태그가 포함되어도 E 타입이 유일하면 선택한다). |
| E:empty | 텍스트 및 공백을 포함하여 자식 요소가 없는 E를 선택한다. |
<!DOCTYPE html>
<html lang="en">
<head>
  <meta charset="UTF-8">
  <meta name="viewport" content="width=device-width, initial-scale=1.0">
  <title>구조적 가상 클래스 선택자 사용하기</title>

  <style>
    h4:last-of-type { /* 마지막 태그의 텍스트 색상 */
      color: red;
      font-size: 20px;
    }
    h4:nth-child(2n+1) {  /* 홀수 태그 */
      background-color: lightblue;
    }
    h4:first-child { /* 첫번째 태그의 텍스트 색상 */
      color: blue;
      background-color: yellow;
      font-size: 20px;
    }
    h4:nth-last-of-type(2n) {  /* 짝수 태그 */
      background-color: pink;
    }
    h4:nth-child(5) {
      color: pink;
      background-color: gray;
      font-size: 20px;
    }
    h4:last-child {
      color: yellow;
      background-color: blue;
    }
  </style>

</head>

<body>
  <div>
    <h4>웹 프로그래밍</h4>
    <h4>웹 프로그래밍</h4>
    <h4>웹 프로그래밍</h4>
    <h4>웹 프로그래밍</h4>
    <h4>웹 프로그래밍</h4>
    <h4>웹 프로그래밍</h4>
    <h4>웹 프로그래밍</h4>
    <h4>웹 프로그래밍</h4>
    <h4>웹 프로그래밍</h4>
    <h4>웹 프로그래밍</h4>
    <h4>웹 프로그래밍</h4>
  </div>
</body>

</html>
▣ UI 요소 상태 가상 클래스 선택자
· 입력 폼의 상태를 선택할 때 사용
| 사용방법 | 의미 |
| E:enabled | 사용 가능한 폼 컨트롤 E를 선택한다. |
| E:disabled | 사용 불가능한 폼 컨트롤 E를 선택한다. |
| E:checked | 선택된 품 컨트롤을 선택한다. |
| E:focus | 초점이 맞추어진 input 태그를 선택한다. |
| 선택자 이름 | 사용 방법 | 의미 |
| 언어 선택자 | E:lang(ko) | HTML lang 속성의 값이 'ko'로 지정된 태그를 선택한다 |
| 부정 선택자 | E:not(S) | S가 아닌 E태그를 선택한다. |
| 목적 선택자 | E:target | E의 url이 요청되면 선택한다. |
| 가상 엘리먼트 선택자 | E::first-line | E 태그의 첫번째 라인을 선택한다. |
| E::first-letter | E 태그의 첫번째 문자를 선택한다. | |
| E::before | E 태그의 시작 지점에 생성된 태그를 선택한다. | |
| E::after | E 태그의 끝 지점에 생성된 태그를 선택한다. |
<!DOCTYPE html>
<html lang="en">
<head>
  <meta charset="UTF-8">
  <meta name="viewport" content="width=device-width, initial-scale=1.0">
  <title>UI 요소 상태 가상 클래스 선택자 사용하기</title>

  <style>
    div {
      color: white;
    }
    h2::first-letter {
      font-size: 30px;
      color: red;
      text-transform: uppercase;
    }
    h3::first-line {
      color: blue
    }
    input:focus {
      background-color: red;
    }
    input:checked + div.d1 {
      background-color: gray;
    }
    input:checked + div.d2 {
      background-color: black;
    }
  </style>

</head>
<body>
  <h2>states pseudo-classes</h2>
  <h3>문제) 대한민국 수도는?</h3>
  <p>정답 작성 : <input type="text"></p>
  <h2>answer</h2>
  힌트 보기 : <input type="checkbox">
  <div class="d1">
    남대문이 있는 곳이죠.
  </div>
  정답 보기 : <input type="checkbox">
  <div class="d2">
    서울
  </div>
</body>
</html>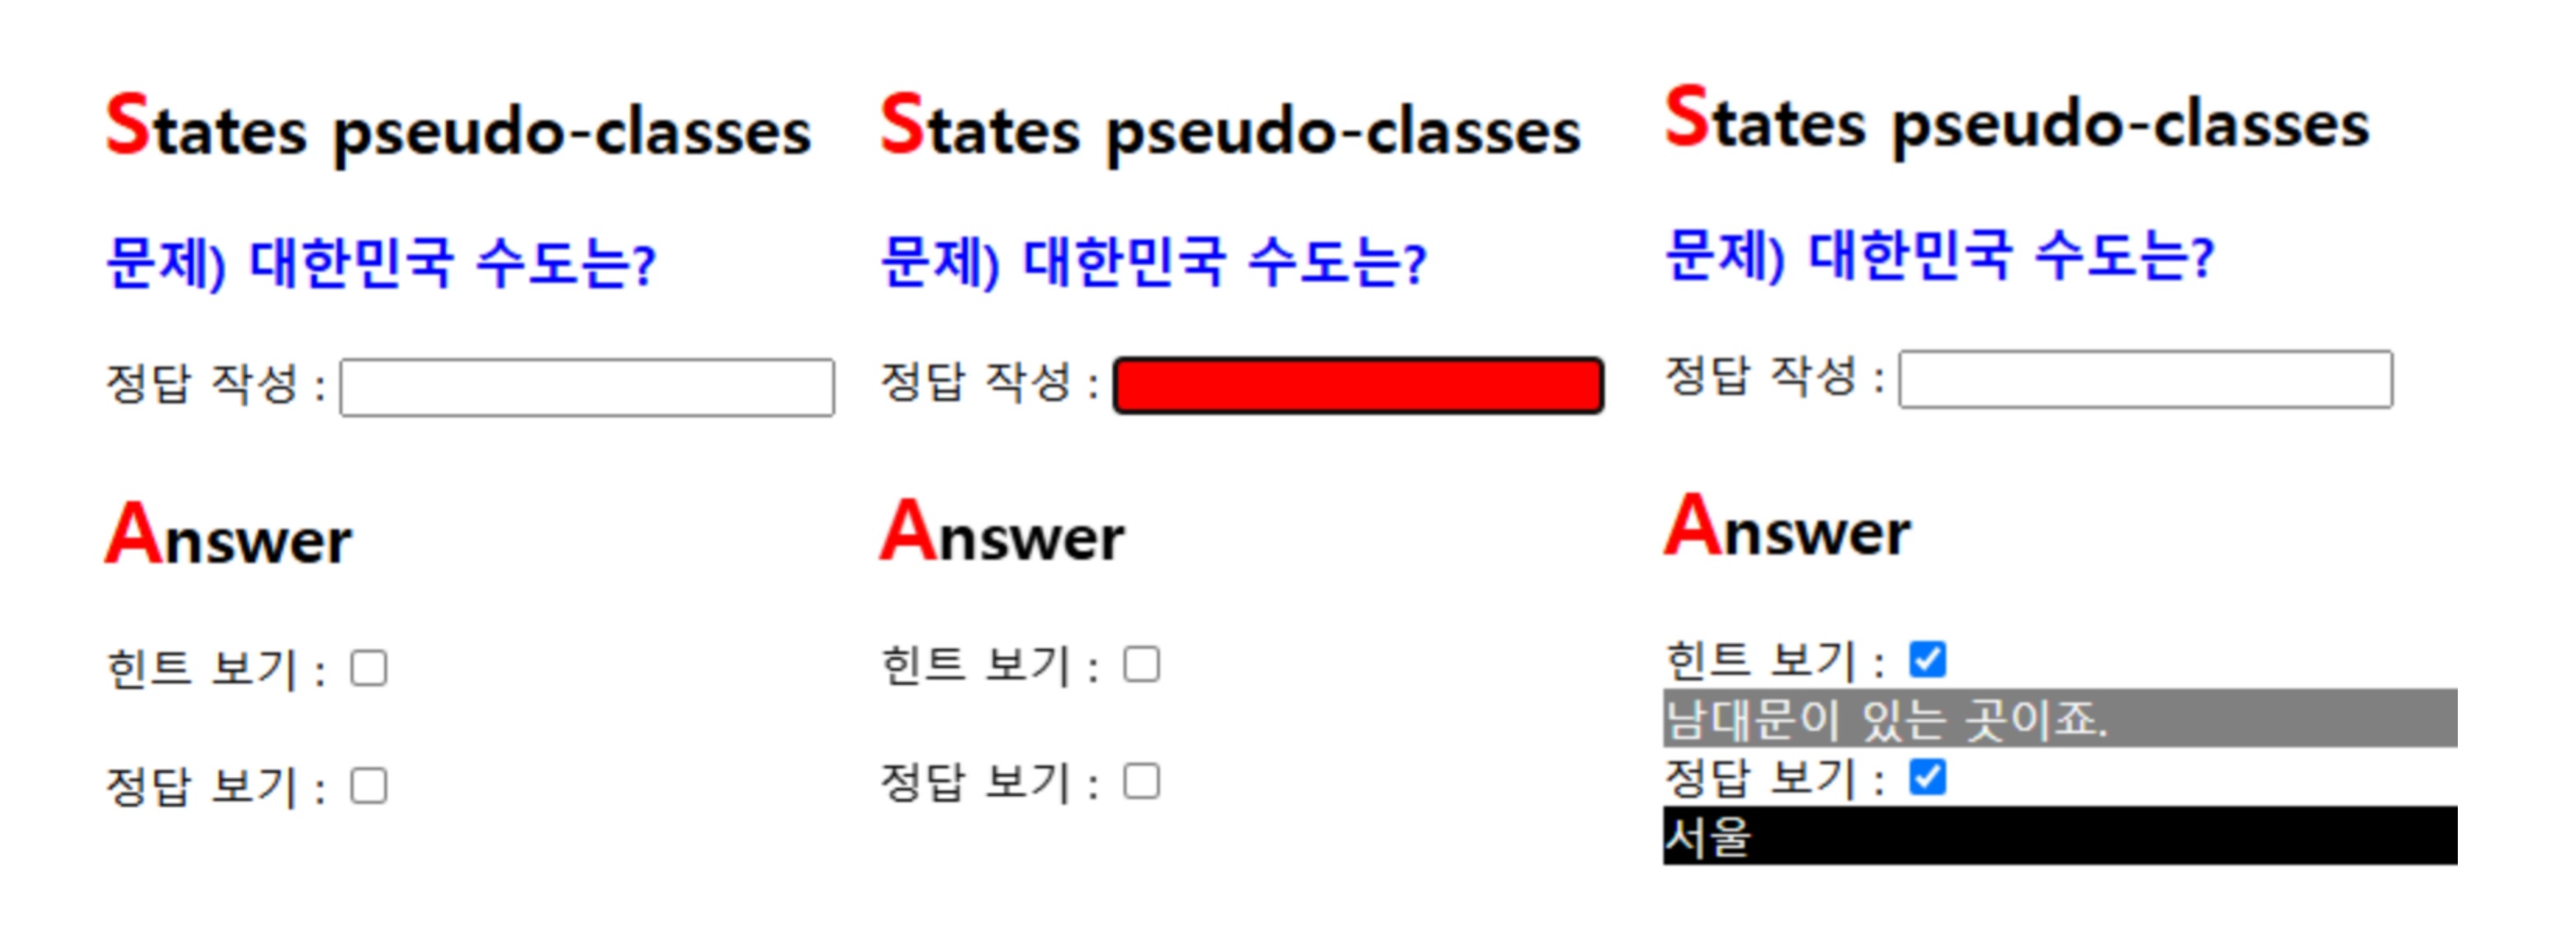
'웹프로그래밍 CSS3 > CSS 사용법과 선택자' 카테고리의 다른 글
| 반응형 웹 (0) | 2025.04.24 |
|---|---|
| 조합 선택자 (0) | 2025.03.11 |
| CSS3 선택자 (0) | 2025.03.11 |
| CSS3 기본 사용법 (0) | 2025.03.11 |
| CSS3 개요 (0) | 2025.03.10 |